Categories
Art & Craft Tutorials, Guides & Advice

My Favourite Art Supplies – part 2

Ahhh it’s the moment you’ve all been waiting for… I reveal more of my favourite art supplies! Keep reading to find out which art supplies I use on a daily basis. Don’t forget to check out part 1 over here.

Acrylic Ink

I love me some drippy drippy ink. These Liquitex ones are very nice and vibrant. I use them for drips, but also to add inky layers to my paintings. Inks to me are one of those really FUN supplies to have, even though I haven’t the faintest clue how you’re ‘supposed’ to use them, so I just do my own thing. How do you use your inks?

Quinacridone Nickel Azo Gold

This paint colour is magical! In the tube it looks like a simple reddish brown, but when you apply it you realise how versatile it is. Especially when used in translucent layers or added to white, it really shows it’s magic. It just adds a warmth and pretties everything up, or grunges things up, depending on what you’re going for. It’s mega expensive but well worth the money.

Catalyst Wedges

Art teacher Pauline Agnew introduced me to these awesome tools. They are basically silicone wedges that you can use to apply or scrape paint. They have a different feel to palette knives and are really unique and versatile. They are simply one more tool in my toolbox to apply paint, create texture, make backgrounds and grungify (this is a word, I say so) my work.

Palette Knife

I spent years not understanding what palette knives were for (apart from taking paint out of paint tubs effectively), then I started working with them and wow, I’m in love! You can scrape and drag paint with them and they instantly give it a grungy and raw look. Scraping paint with a palette knife is one of my favourite things to do in my artwork and it fits in so well with the feelings I’m wishing to convey. I especially like this metal one, plastic ones are a good budget alternative, but a metal one does work more effectively.

Fluorescent Pencils

These chunky neon pencils are my favourites! I love adding details to my art journal pages with them. They really have that fluorescent look. They come in more colours, but these are the only ones I use

So tell me, which art supplies can’t you live without?

Categories
Art & Craft Tutorials, Guides & Advice

My Favourite Art Supplies – part 1

I love art supplies, I’m a real art supply addict! I often get questions about what supplies I use and love, so I thought it would be fun to create a couple of blog posts highlighting my favourite art supplies.

Brayers

I love my brayer! I have a few different ones. The one pictured is a Speedball brayer which is nice and soft and is my favourite. I also use lino print brayers which are more firm (but cheaper!). I use brayers to apply paint to backgrounds. It’s an instant gratification texture tool and my work wouldn’t be the same without it.

Watercolours

When I first got my watercolours I went through a watercolour phase. Then I realised I could use them in mixed media. Now my favourite way of using watercolours is on top of layers of acrylic. I put together my own palette of Schmincke half pans and a couple of Daniel Smith (shown here is a 12 half pan palette with the colours I use most often)

Pencil Sharpener

I know this seems like the most pointless (harhardehar, see what I did there?) item, but I recently bought a new pencil sharpener and it’s the best thing since sliced bread (slice… get it.. get it?? *bows* I’ll be here all day). It made me realise how incredibly BLUNT my old one was and in addition this little Stabilo sharpener works slightly differently to regular pencil sharpeners. It can achieve a REALLY sharp point and also sharpens more akin to how pencils come when you buy them (the wood of the sharpened bit comes out shorter than with other sharpeners). So yes, I am a real art supply nerd!

Hand Carved Mini Stamps

I’m not a huge crafter, but I do love using crafts to support my art habits. These are some mini stamps (they measure about 2x2cm) that I carved myself. I wanted stamps with certain symbols that I use in my art a lot, and because they are personal symbols I obviously couldn’t buy them from a shop! I used Speedball Speedycarve which is much softer and easy to cut than traditional lino or erasers. This is essential to me as I suffer from RSI very easily.

Chalk Paint

I love matte paints both from a practical point of view as an art journaler (less chance of pages sticking together) and from an aesthetic point of view (pretty!). Paper Artsy make a great range of chalk paints. My favourite colour is Nougat, but I couldn’t get it at my local store, so I got Chalk instead and added a tiny bit of pink and ochre to achieve a warmer/offwhite colour. Whenever you see big areas of off-white in my art, you can bet it’s this chalk paint. I just wish it came in a big tub!

Colour Brush Pen

This is a funny one. I used a tester pen at the shop and got wonderful black lines. But ín the one I bought the ink doesn’t really flow properly. At first I thought about taking it back and getting a refund, but then I realised that the dry brush and grungy effect it created was perfect!

Tell me in the comments below what YOUR favourite art supplies are and how you use them?

And remember to check back soon for part 2!

Categories
Art & Craft Tutorials, Guides & Advice

Tips For Mixing Your Media

I love mixed media! I’m a mixed media artist! But what does this term ‘mixed media’ really mean? And how do you apply it practically when making art? Keep reading for insights and tips about the how, why and what of mixed media art.

What Is Mixed Media?

Traditionally artists would work in one medium. For example oil paint, egg tempera or collage. Mixed media simply means using any of the above and more but in ONE piece.

Rules? I Don’t Want No Stinking Rules!

One misconception I come across a lot is that mixed media is supposed to have a certain look or style. This is not true. Mixed media comes into existence automatically when you use more than one medium. You’re totally free to do whatever you want!

Then again, being totally free without any ‘rules’ can be rather scary when you’re just getting started.

Mixed Media Tips

Start simple.

Because you have ALL THE SUPPLIES to choose from, it’s easy to get overwhelmed and turn your work into a ‘wtf did I do?’ mess. I wholeheartedly recommend making big messes, but I do want to help you avoid overwhelm, because that feeling is not fun. When you’re getting started pick two things you want to work with primarily on a piece. Keep going with those until you feel compelled to use something else (or maybe you never do, that is fine too!).

Here are some combos to get you started:
-collage papers & acrylic paint
-watercolours & coloured pencils
-watersoluble crayons & stamps

Find out what works (for you!).

Part of this is trial and error and simply trying things (without getting too attached to the outcome). There are certain materials that work well together, and other materials that when used in combination make you tear your hair out!

Here are some tips & common pitfalls to avoid:
-beware of clogging your paint pen tips when working on top of watersoluble crayons
-you CAN mix oil and acrylic, but it’s best to leave the oil based media for the final layers.
-to maintain bright colours and avoid making a muddy mess, ensure you dry your work in between layers
-think outside the box when it comes to application. Sometimes it’s much nicer to use your fingers than a brush. How about a brayer?
-if you want to work on top of your acrylics with pencils, it is helpful to use matte acrylics rather than the more shiny ones (as they dry quite plasticy)
-be aware of media that react/re-activate when wet (e.g. Dylusions sprays, certain inks, watercolours), if you work on top of them you might want to use spray varnish first to avoid things such as green faces (tip suggested by Amber Button)

Gesso.

Let me introduce you to a bit of magic! Gesso is a primer. That means it prepares the surface for whatever you decide to put on top of it. Mixed media work tends to be either wet or heavy, or both. A lot of paper doesn’t stand up to this very well (especially if you like working in journals or altered books), so adding a layer of gesso can really help make your paper suitable.

White gesso is a great primer for using before you start. Clear gesso is awesome for in-between layers if you want to protect a previous layer and create a more workable layer to keep going on top of. For example clear gesso after a layer of collage can help you be able to continue with coloured pencils or crayons.

Experiment

Of course this is only the tip of the iceberg when it comes to mixed media! There are so many possibilities and so many ways of expressing yourself. I’d love to know your favourite ways of mixing your media, please leave a comment below!

Categories
Art & Craft Tutorials, Guides & Advice

How to set up your art space for mixed media and art journaling

My top 5 tips for organizing your art space and having a great setup. Watch the short video below or read the transcript underneath.

Tip 1. A Tidy Start

Clutter kills creativity. OK maybe not, but a clutter of art supplies when I start makes me feel overwhelmed with too many choices. A clean desk means I can start with a sense of calm and go from there.

Tip 2. Workspace Aplenty

I’m sure lots of you can relate to having only a small space to work in. It’s important to have more surface than just what you need for your journal or substrate. That way you can have the materials you’re working with around you. Set up a foldable table if possible.

Tip 3. Get Organized

Everything should have its own place. It will help you find this quickly and also makes tidying up much easier.

Tip 4. Quick Access

When it’s hidden away, I don’t use it and forget I have it. All my favourite art supplies are within arms reach and visible. That way I can quickly grab what I need without having to get up. It really helps me stay in the creative flow.

Tip 5. Get Rid Of It!

If you don’t use it, lose it! It clutters up your art space and makes you feel like you ‘should’ use it. If you don’t use or enjoy certain supplies, get rid of them (Freecycle, charity shop, arty friends) and make space for things you DO like.

Categories
Art & Craft Tutorials, Guides & Advice

How To Price Your Art?

It’s a simple question, but there seems to be no clean cut answer. Let’s face it, pricing your art is difficult, it’s an emotional subject, it might trigger lots of doubts & insecurities and all the opinions out there might not actually help you come to a conclusion or more importantly: your price.

When figuring out the price of your work there are two considerations: practical pricing aspects & emotional pricing aspects. I’ve also included a bonus section on how not to price your art.

Practical Pricing Aspects

There are a few techniques you can use and things to consider when trying to work out a price.

Your Materials what are the costs of the things you used up in making the art? Think of all materials including paints/other media, embellishments/objects, varnish, substrate, framing if applicable.

Your Time is there a minimum charge per hour that you want/need to get paid? Almost any job has an hourly rate. Having a think about what yours is will help you not undervalue your painting. e.g. if you spend 6 hours on a painting and charge £$€50 (whatever your currency is), you will be getting paid £$€8.33 per hour. Is that enough, or not?

Price For Size a handy starting point to arrive at a figure for differently sized work is working out a price per square inch. Start with £$€1. That means a 12×12″ work is £$€144. Work backwards thinking of your materials & your time. Is it enough or does it need adjusting? Try increasing it by 0.5 increments. As the popularity, collectability and skill of your work increases you might increase the overall price.

Consistency it is helpful if you price your work with some semblance of consistency. Pricing one piece at £$€50 and another similarly sized one for £$€500 doesn’t make sense and may affect your integrity.

Emotional Pricing Aspects

Uncomfortable the right price usually makes you slightly uncomfortable. It can trigger your feelings of not feeling good or worthy. But better to price at a level where you feel appreciated, than a price where you feel comfortable but then when you sell you feel resentful. I have found that letting go of a piece of art is always hard, but when the price is right it’s easier because it feels like a beautiful exchange rather than the feeling of ‘losing’ something.

Your Wish what is the amount you would LOVE to get paid for this? Not the amount you ‘think people will pay’. Not the amount you ‘think it is worth’. What is the amount you need to feel completely and utterly valued? That’s your price.

Fear Of What Other People Think what if people laugh? What if people think ‘who does s/he think s/he is’? What if they think it’s insanely expensive? Or cheap and therefore rubbish? That says something about them, not about you. It is not your job to predetermine what other people will think. It is only your job to put your art out into the world. You can’t know in advance whether other people find a price worth it, or expensive, or cheap. Chances are all these opinions will exist, but they are not your client, your client is the one who wants your art and is happy to pay your price (or save up for it, or buy a print instead).

Your Audience people don’t tend to buy art the way they buy a microwave or jeans (e.g. I need a new microwave/jeans, this is my budget and now I’m going to shop around until I find the thing that best suits my needs). No one buys art because they need it, they buy it because they want it. When someone buys your art it’s usually because they want your art. You build up a connection with your audience, your collectors, your tribe. Those are the people who will buy from you. By building up this group of people you will also ensure they value your work.

How NOT To Price Your Art

Common pitfalls and ways in which we tend to undervalue or mis-price our art.

Charging what someone else charges you’re comparing apples with pears. Trying to deduce the value of your art by looking at other people’s prices will never give you the answer.

Undercutting pricing slightly cheaper than others in order to sell your product might work for TVs or pints of milk, but if you do it with your art you’re undervaluing it and misunderstanding its place in the world

Competing with mass production this comes back to the point above about building up your audience so people want and buy your art because it’s yours. People will never value your art if you see it as something that has to compete with a mass produced canvas from IKEA.

Asking a friend/family member what they’d pay this one is so tempting!! But they are not your audience! Avoid this one if you want to keep your sanity and loving relationships.


I hope that has given you some things to think about in order to price your art confidently! I’d love to know what you thought and if you have any tips, let me know in the comments below!

Categories
Art & Craft Art Journal Tutorials, Guides & Advice Videos

Do It For Fun, Do It For You

I’ve made 13 short art journal videos in the last 20 days. That’s a reason in itself to celebrate! But what it also gives me the opportunity to do is examine my ways of working, my habits and my reasons. And then to share these insights with you in the hope that you find it useful too!

The thing I’ve noticed most of all from doing a challenge in which I only spend 15 minutes on a page and from recording the process, is that I want art to be easy and fun. That’s also why I’m sharing these videos. The art making is for me, but the video making is to share and give back, because I so appreciate everyone out there who shares their process and helps people like me get inspired, be entertained and get better!

It would be really easy NOT to share these videos of quick pages. After all they’re not masterpieces, nor super in-depth tutorials, but I think the key to what they do have is that they are fun and lighthearted. I want to show that you can make something nice in 15 minutes, that you don’t need to take it too seriously, that it can be beautiful or it can be average.

I think a lot of us feel held back by the thought that whatever we do (and especially whatever we share) needs to be somehow GOOD or MEANINGFUL. We think it has to be WORTHY. And then we attach a load of restrictions on ourselves in terms of what fulfills those criteria. What I’m saying is: it doesn’t have to be any of those things. Let go of the harsh judgements and requirements or the worry of what others may think, and instead do it for fun. Do it because it makes you feel joyful.

In sharing everything I attempt (even the messes and fuckups) I’m hoping that you get inspired to make art too and embrace the joy and let things be what they are. Let’s remove the pressure and let ourselves play!

Also, in case you were wondering, the days in November for which there are no videos are simply because I didn’t have the time or capability to film on those days, not because I’m filtering what I share.

Here are 3 of my favourite videos, and as a bonus the 4th video is the fuckup. Important! I call it a fuckup tongue in cheek. I am not feeling badly or being down on myself, I’m just being humorous because I don’t particularly like that page, but I see it as part of the process and I fully accept it and love it in its own way. I encourage you to do the same with your ‘oopsies’, love them and let go.


Day 19: Smudgy smudgy with oil pastels & oil bar


Day 5: Neocolor II and stenciling fun


Day 9: Drippy drippy inks


Day 12: A weird alien type person, wtf??

Categories
Art & Craft Tutorials, Guides & Advice

5 Tips To Develop Your Unique Art Style

Ask any starting artist and this is pretty much the holy grail, the thing they’re looking for, the elusive concept, the thing that excites them and the thing that makes them despair….:

Developing your own style

I’ve been doing this art thing fairly seriously now for 2 years, and I still struggle with this on a daily basis. I can see glimpses sometimes and other times I’m like an impatient child stomping their feet: WHEN is it FINALLY going to HAPPEN?

So, while I’m having my own little personal struggle here, let me share with you these five tips to developing your own art style. Follow these top tips and I promise you, IT WILL HAPPEN. Bit by bit, your style will start to emerge. You won’t even notice it, but when you look back it will be there. All of a sudden people will say things like ‘I love your style!’ or ‘I knew that painting was yours!’ or you will recognise yourself the elements that make up your personal style.


Tip 1: Create A Series

Creating a series of paintings is a great way to hone your skill and practice doing the same thing but differently. Ways of approaching this could be to pick a certain colour scheme to work in and with a certain theme or subject. For example creating four paintings of doves and/or using the same 3-4 colours in each painting. You could also do something more abstract with a similar colour scheme and similar shapes across the pieces.

When creating a series it can be helpful to work on all paintings at the same time. This will help make things easier with achieving consistency across the paintings.


Tip 2: Do A Challenge

The thing that kickstarted my creativity big time was joining the Art 101 challenge . I joined a group of people who were all going to complete a certain number of paintings within 101 days. Having an achievable goal in mind and a timeframe within which to do it can be great motivation. Practice and simply DOING IT is such a big part of developing your style, and doing a challenge really helps you get down and do it. Get together with other people to support each other and hold each other accountable.

Formats you can consider for challenges are things like: create x number of paintings in y days / 10 minutes of sketching every day / draw one face a day for 100 days


Tip 3: Notice Your Likes & Dislikes

What is it you enjoy drawing or painting? Are you really drawn to certain subject matter, shapes or colours? You can analyse your own work and then build on it. If you see yourself doing and enjoying certain things, start amplifying those things and do them consciously.

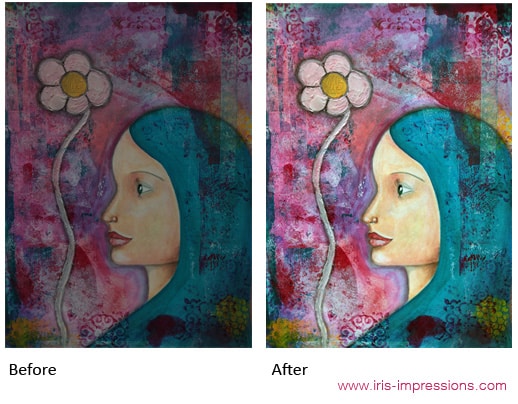
For me I LOVE creating faces. Then within the faces I notice more things that I like doing, like where I enjoy placement of the features (e.g. mouth low in the face, nearly no chin) or what shape eyes I like to paint.

This can also relate to certain types of art supplies or techniques. Anything that you love working with and would like to do again and again.

Conversely if you notice yourself not enjoying things, then don’t feel like you need to do them. Don’t create the expectation that your work needs to include elements or techniques that you don’t actually enjoy. For me that might be lots of doodles or trying to make things very realistic.


Tip 4: Develop Your Personal Imagery

We all have our own personal story. Certain subjects or symbols might deeply resonate with us and it is helpful to sit down and have a think about that. These could be shapes, symbols, animals, plants, flowers etc. Anything that has a personal symbolic meaning to you could become part of the imagery that you draw from to create your paintings.

If you look at famous painters they usually have a very strong visual language. This is partly the thing that makes their paintings recognisably theirs.

It can be helpful to compile a list of 5-10 things that are meaningful to you and that you want to have show up in your art. You can then even practice sketching them. For me a few recurring symbols are: teardrops, cypress trees/cat tails, spirals, crowns, rectangular buildings, blushing faces, sun bursts.


Tip 5: Study The Masters

Copy, copy, copy! Copying an existing work of art (this is called a study, and remember to ALWAYS give credit, whether the artist is super famous or whether it’s your next door neighbour (who may or may not be famous)) is an excellent way to practice technique.

Take a step back and analyse the different parts of the painting. Ask yourself how you would recreate something and how you would deviate from it if you were doing things ‘your way’. Set yourself a challenge to recreate someone else’s painting, but giving it your own spin (take your knowledge from the tips above).


Your style is within you. It’s waiting to emerge, but it needs practice and encouragement. It will develop, it will come out. Keep making art, keep showing up, keep sharing, keep on being you!

If you’re looking for more guidance to develop your own style, you’ll love Radiant: Art Journals. 15 teachers have prepared wonderfully in-depth lessons for you so you can spread your own creative wings in the safe space of your own art journal. I hope you will join us!

Are you looking to find your own art style? What is it you struggle with? Or are you a more established artist who has gone through this? What is your top tip? Share your thoughts with us below!

Categories
Art & Craft Tutorials, Guides & Advice

5 Reasons You’re Not Happy With Your Art Journal Pages

photo credit: Broken Flowers via photopin (license)

I know very well what it’s like to want to do art, but every time you sit down and do it, you’re feeling crappy about the result. It’s really inhibiting and it might even stop you from creating next time. I don’t want that for you (or for myself)! So here are some insights that might help you understand why this happens and what you can do to change it.


1. You need practice

There is no way around it: practice makes progress. There are no shortcuts and you have to put in the time. Imagine you’re going to learn a language, it will take some weeks to grasp the basics, quite a few more to be semi-proficient and several years to be fluent. The more you practice making art, the more fluent you become and the easier it will be for you to create things you like, simply because of your skill level.

I love this quote:

Never compare your beginning to someone else’s middle
-Jon Acuff

Another awesome resource is this video with words from Ira Glass. It’s called ‘The Gap’ and is about that ‘gap’ that exists between knowing what art you find beautiful and actually being able to achieve it yourself.


2. You are attached to the outcome

Leading on from the concept of ‘the gap’ explained above, it’s very frustrating if you have something specific in mind and aren’t quite able to execute it as nicely as you see it in your imagination. This partly comes back to practice, but another thing that you can try which to me absolutely transforms the process of art making is: to let go of the outcome.

Art is weird and wonderful, it’s a process, not just paint by numbers. Try and place yourself firmly in the current moment, rather than in the future where this finished (perfect) artwork exists. What can you do now that you enjoy, that is an expression of yourself? Let the art emerge from moment to moment, rather than working towards a fixed outcome.

An example of this might be that you are going to paint a portrait. But instead of trying to make it picture perfect or photo realistic, let it come alive through your personal filter of your mind, hands & body. This is actually where the most original art comes from in my opinion!


3. You need to add more detail

One of the things I notice a lot in the art of beginners is that it somehow looks unfinished or unrefined. It’s not necessarily a lack of technical skill (I think beginner’s art can have a great sense of freedom! As well as art made by kids) but a lack of going back in and making things look complete. It’s probably also to do with confidence. I see this in how people shade faces, they know where to put the shadows and the highlights but they’re not confident enough to make it BOLD. Make the darks really dark and let the highlights pop out!

You’ll be surprised at how a painting can transform by just paying a bit more attention to the details and finishing touches. Pay attention to shadows/highlights, use outlines and shading, create halos around people/objects, add little doodles or dots.


4. You’re working against your supplies

There are no rules about how you must use your art supplies (or which specific supplies to use), but there are definitely ways in which to use them effectively and ways in which to use them that make you want to scream and tear your hair out!

You’ll have to experiment yourself with specific things that feel frustrating that might be solved by a different technique (try Googling or a search on YouTube!), but here are some things that I’ve found frustrating and ideas on how to make them better.

Paper pilling (rubbing off / forming little balls):

-Use gesso first or a layer of acrylics. Make sure this layer is thoroughly dry before continuing

Paint not applying smoothly:
-Dilute slightly with water or matte medium/PVA glue
-Work BIGGER! Tiny fiddly work is especially hard when you’re a beginner. Scale up and then when you’ve gained experience, scale down again
-Use different or better quality brushes

Backgrounds look muddy or brown instead of vibrant (also especially applicable while Gelli printing):
-Try not to mix complementary colours (blue/orange, purple/yellow, red/green)
-Only apply either cool colours (blues/greens/cool purple) or warm colours (red, yellow, orange) together.
-Dry thoroughly in between layers.


5. You’re doing the wrong thing

Why are you doing this? Whose art are you making? I often fall into the trap of seeing other people’s art and admiring it so much that I want to recreate it or I want my art to look like that. So off I go on a very results orientated journey, which I often find very frustrating and unfulfilling. So ask yourself what your goal is. How do you want to feel? What do you really want to make? How do you like using your supplies? Why do you want to create art in the first place?

There are no right answers to these questions, just your answers that will give you an insight into your personal whys and hows.


If you’ve got any tips to share, please post them below in the comments! Can’t wait to hear what your favourite methods are for enjoying making art.

Categories
Art & Craft Featured Tutorials, Guides & Advice

How To Photograph/Scan Your Art And Prepare It For High Quality Art Prints

I wanted to share some tips with you all about how I create scans/pictures of my art and edit them in Photoshop. Below I walk you through the entire process I use to prepare my images to make high quality prints. Don’t forget to Share, Tweet or Pin this article if you find it helpful!

Photographing Your Art

Most of my art is too big or awkward for my A4 scanner, so I photograph it with my Nikon Coolpix P7800. Pretty much any digital camera will do as long as you make sure to set it to the highest quality & resolution. This amazing video by Tyler Stalman & Jason Eng created for Saatchi Online explains perfectly how to take good pictures of your art.

Using a tripod (or some other way to stabilise your camera) is essential. I attach my artwork to the wall with Blu Tack or picture hanging strips. I use a spirit level to ensure it is completely straight. I also make sure my tripod is leveled and the camera is straight. The more accurate you can be about this, the less you will have to ‘fix’ in Photoshop in terms of distorting the picture to make it fit.

I have a window on the left side of the wall which throws light, so I use a simple soft box light pointing at the painting from the right. You are trying to achieve equal soft lighting on the whole painting, no direct harsh light or shadows.

Using manual focus if your camera allows it is helpful. Nothing is more annoying than loading the pictures onto your computer only to find that they are not in focus or not everything is in equal focus.

Scanning Your Art

If your art is relatively flat and fits on your scanner it is preferable to use this method. You won’t be at the mercy of varying lighting conditions and a scanner will get great detail and every bit will be in focus.

Before scanning ensure the resolution is set to 300ppi. Depending on your scanner you may need to adjust the brightness and contrast. From the point of view of being able to adjust later in Photoshop, I prefer a scan that is slightly on the dark side over one that is too light. Adjust the brightness & contrast sliders and keep previewing until the preview matches the colours, detail & contrast of the original artwork. If you can, save these settings as a new profile so you can quickly access them next time.

Default Scan Settings & Adjusted Scan Settings. © www.iris-impressions.com @rrreow #scanningart #scanningartwork
On the left the default scanner settings, on the right with brightness & contrast adjusted. The adjusted scan is much more true to the original artwork. The default loses a lot of detail by being too bright and the colours are washed out.

Adjusting Your Art In Photoshop

I use Photoshop CS2, but any programme that allows you to adjust these settings will do. Editing in Photoshop is especially good for when you’ve photographed your art.

First I want to straighten up my art piece and make sure it fills up the whole canvas. I use the Rectangular Marquee tool to select as close around the artwork as I can, without cutting any of it off. Then I crop the image (Image > Crop). This may mean that on some sides the background still shows. To fix that, I use the Transform tool (Ctrl+T), and right click on the image and select Skew. I then drag the corners out where necessary. If you need to rotate your canvas with the transform tool (you shouldn’t have to if you followed the steps for straightening the artwork on the wall and leveling your tripod – it’s really worth doing!) do that before skewing.

Now we make the magic happen. First go to Image > Adjustments > Auto Levels. If it looks good, keep it. If it looks “WHOA TOO MUCH!” you can fade the effect by going to Edit > Fade Auto Levels and select a percentage. Then go to Image > Adjustments > Auto Contrast. Fade again if needed. Finally we use Image > Adjustments > Auto Color (and Fade).

Photo of Painting & Adjusted in Photoshop. © www.iris-impressions.com @rrreow #editingart #photoshop

How much you use these three tools depends on how true to life the pictures/scans you took are. Sometimes I hardly need to change anything, other times it makes a huge difference.

Save your picture at a high setting. I tend to go for File > Save As and then select jpg at Quality 12. There are other file types with less compression, but I’ve found there is no visually noticeable data loss with this setting and it keeps file sizes manageable.

Voila!

Now you’ve got your hi-res digital master to make prints of forevermore, even if you sell the original!

If you follow this tutorial please let me know in the comments, I’d love to know how you got on. If you have any questions I’ll be happy to answer them!

Categories
Art & Craft Art Journal Musings Tutorials, Guides & Advice

It Can Be Simple

it-can-be-simple

I love art supplies. I have a LOT of art supplies. The choices are endless when I’m creating something, but I often have to remind myself: it can be simple.

When you have a lot of tools available the temptation is to want to use all of them, which can be to the detriment of the art piece. I love complex pieces with many layers that make you wonder ‘how did s/he do that?’, but sometimes it’s OK to pare it right back. Minimalism can be tasteful, it draws attention to the important elements and lets the piece breathe.

I have the same thing with blog posts. I feel they have to be long and in depth. So instead, I will stop writing now and leave you with some works in which I have tried to simplify.

2014-01-06-Pages

2010-08(Aug)-Worthy

2010-09(Sep)-Growing