
I wanted to share some tips with you all about how I create scans/pictures of my art and edit them in Photoshop. Below I walk you through the entire process I use to prepare my images to make high quality prints. Don’t forget to Share, Tweet or Pin this article if you find it helpful!
Photographing Your Art
Most of my art is too big or awkward for my A4 scanner, so I photograph it with my Nikon Coolpix P7800. Pretty much any digital camera will do as long as you make sure to set it to the highest quality & resolution. This amazing video by Tyler Stalman & Jason Eng created for Saatchi Online explains perfectly how to take good pictures of your art.
Using a tripod (or some other way to stabilise your camera) is essential. I attach my artwork to the wall with Blu Tack or picture hanging strips. I use a spirit level to ensure it is completely straight. I also make sure my tripod is leveled and the camera is straight. The more accurate you can be about this, the less you will have to ‘fix’ in Photoshop in terms of distorting the picture to make it fit.
I have a window on the left side of the wall which throws light, so I use a simple soft box light pointing at the painting from the right. You are trying to achieve equal soft lighting on the whole painting, no direct harsh light or shadows.
Using manual focus if your camera allows it is helpful. Nothing is more annoying than loading the pictures onto your computer only to find that they are not in focus or not everything is in equal focus.
Scanning Your Art
If your art is relatively flat and fits on your scanner it is preferable to use this method. You won’t be at the mercy of varying lighting conditions and a scanner will get great detail and every bit will be in focus.
Before scanning ensure the resolution is set to 300ppi. Depending on your scanner you may need to adjust the brightness and contrast. From the point of view of being able to adjust later in Photoshop, I prefer a scan that is slightly on the dark side over one that is too light. Adjust the brightness & contrast sliders and keep previewing until the preview matches the colours, detail & contrast of the original artwork. If you can, save these settings as a new profile so you can quickly access them next time.

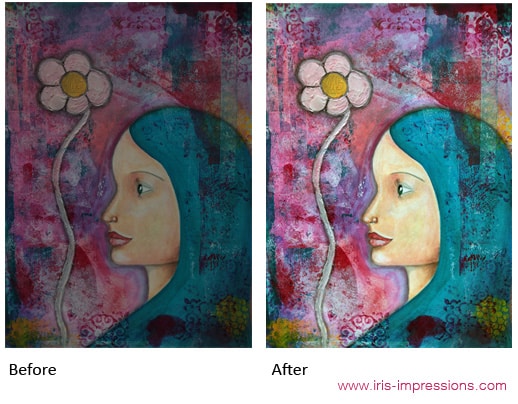
On the left the default scanner settings, on the right with brightness & contrast adjusted. The adjusted scan is much more true to the original artwork. The default loses a lot of detail by being too bright and the colours are washed out.
Adjusting Your Art In Photoshop
I use Photoshop CS2, but any programme that allows you to adjust these settings will do. Editing in Photoshop is especially good for when you’ve photographed your art.
First I want to straighten up my art piece and make sure it fills up the whole canvas. I use the Rectangular Marquee tool to select as close around the artwork as I can, without cutting any of it off. Then I crop the image (Image > Crop). This may mean that on some sides the background still shows. To fix that, I use the Transform tool (Ctrl+T), and right click on the image and select Skew. I then drag the corners out where necessary. If you need to rotate your canvas with the transform tool (you shouldn’t have to if you followed the steps for straightening the artwork on the wall and leveling your tripod – it’s really worth doing!) do that before skewing.
Now we make the magic happen. First go to Image > Adjustments > Auto Levels. If it looks good, keep it. If it looks “WHOA TOO MUCH!” you can fade the effect by going to Edit > Fade Auto Levels and select a percentage. Then go to Image > Adjustments > Auto Contrast. Fade again if needed. Finally we use Image > Adjustments > Auto Color (and Fade).
How much you use these three tools depends on how true to life the pictures/scans you took are. Sometimes I hardly need to change anything, other times it makes a huge difference.
Save your picture at a high setting. I tend to go for File > Save As and then select jpg at Quality 12. There are other file types with less compression, but I’ve found there is no visually noticeable data loss with this setting and it keeps file sizes manageable.
Voila!
Now you’ve got your hi-res digital master to make prints of forevermore, even if you sell the original!
If you follow this tutorial please let me know in the comments, I’d love to know how you got on. If you have any questions I’ll be happy to answer them!
31 replies on “How To Photograph/Scan Your Art And Prepare It For High Quality Art Prints”
I always used the manual adjustments, but maybe I should just use the auto ones! Heh. Anyway, this is a great resource for all 🙂
I love the auto ones for images that need a lot of work. It’s like an instant fix that you can then work on further if needed. For images that come from the scanner the auto options don’t usually do much (I guess Photoshop doesn’t detect much that needs ‘fixing’), at which point I manually adjust levels or curves to enhance the contrast and sometimes fiddle with the colours a little bit.
Thanks for posting this! Very timing because I want to produce art prints of my boot girls. I tried scanning one but it came out far from the original! 🙁 Some friends advised me to take photo instead. Will see. Thank you!
Glad you found it helpful Airees! I’d still try to pursue scanning in the first instance and trying the tweaks to brightness/contrast that I talked about. Photos are subject to so many other factors that it’s well worth getting your scanner settings right as it’s so much quicker and easier!
Thanks, Iris. You’re right. Will give my scanner one more chance! 🙂
[…] also plan to try out the tips in this tutorial for making the best quality art prints i can for my gorgeous customers! i hope you enjoyed this […]
Thanks Iris! This is great information to have. I appreciate all you do to help your fellow artist along our journey <3
You’re welcome Carol, glad you found it helpful!
Iris, thank you for this post. So simple and I have one ready to print piece! I was pleasantly surprised to see Leonie’s Amazing Biz & Life Academy, Kelly Rae’s Flying Lessons and Hello Soul Mixed Media Mantras course recommendations on the side bar, as well as a few familiar faces on your facebook page. So nice to ‘meet’ you here!
Nathalie 🙂
Glad you found it useful Nathalie! Great to hear we have these networks in common. =)
thank you Iris… I tried!! my little works can go under the scanner!!
Thanks Iris. Wonderful information as usual. I can’t wait to try this. I’ve been taking my art to a local printer and paying him to scan. I’m getting ready to move though and would really like to take my own pictures.
Iris,
This is a great post as usual. As a graphic designer, you’d think this would all be second nature to me but what I found very interesting was the bit about photographing art and the video. I have only scanned my art but I have a digital SLR camera and need to start photographing my art as well, so thanks for those tips. As for your Photoshop advice, you are spot on. As one becomes more advanced, you can play with the levels manually instead of just the auto but that’s perfect when you’re getting started. You can also learn to get tricky and scan or photograph journal spreads. In photoshop you can use some fancy tools such as the clone stamp tool and spot healing brush tool to get rid of the crease, fold in the middle or any smudges and things you don’t like. You can also use the blur tool to smooth out bits if need be. (Just some extra tips, you know me always throwing in my 2 cents) but thank you so much, I learned a lot!
Great tips thank you Amber! After I scan something I often see lots of dust or hairs (haha!) which Photoshop is also great at getting rid of!
Iris, this is a fantastic article! Thanks so much for taking the time to share it with us.
thank you Iris, for this information. I am trying to figure out this print process and I know this will help. I am with you in several groups online. but found this from the backroom to the artist auction. have a great day!!
Jane
Great article, thanks! I mostly do botanical illustration and have been frustrated in the past by trying to scan and edit pieces with soft colors and a lot of white paper. Any special tips for these conditions?
Hey Karen, glad you found this helpful! If your paper has a lot of white, I’d recommend experimenting with the brightness/contrast settings on your scanner. You want to avoid the bright light from the scanner completely blowing out and overexposing the subtle colourwork.
Great article!
I paint with watercolors e.g. a colourful bird with no background on Canson Arches 300 g/m2. So as the background you can see the paper structure.
How do you prepare such an artwork for printing, so you don’t see the watercolor paper structure on the print?
Best regards
Kamilla
Hey Kamilla, great question! You can try and increase the brightness which usually flattens out the lighter bits of the picture. If that makes the rest of the picture too light, you could use a programme like Photoshop to lighten only the white part of the picture (you can use the freeform selection tool or the magic wand tool to select all the white background of the picture, and then create an adjustment layer to increase the brightness).
This is great info!! I was wondering about the 300dpi when you scan. My scanner also has a 600dpi. My instincts say “600 must be better than 300”, but is that true? Is there a reason you choose 330 dpi over 600 dpi?
It means you’ll have more pixels (i.e. more ‘information’ in the picture). If you’re scanning it for posting on social media or just for a record it’s not a big deal, but let’s say you’re scanning to blow something up very big (like for a poster), then you’d want 600 or even bigger if your scanner offers it.
Hi, thanks for the tips! What about black; in watercolor after you scanned black, it is very spotty and has reflections. Is it good to edit as edit as smooth black before printing -lets say -cards? What if you paint small snowflakes on top of the color with white acryl, do you need to edit them as pure white before printing into cards? I`m especially puzzled with the black silhouettes.
Thank you so much for your time and the answer!
Really interesting questions Johanna. I think it’s entirely up to you whether you want to edit things before printing. If you are getting reflections when scanning you might try taking photographs instead (the light from the scanner is very strong, so it’s likely you will get reflections). Some editing may be necessary to get things to look the way they did in the original piece.
With regards to editing certain things to be one colour, again this is a choice. If you want the print to be a true reflection of what the painting looked like, you could leave it the way it is. If you want it to be more ‘illustratory’ rather than painterly you could edit the colours to be more solid rather than allowing for the natural variation in colour.
Thank you! I’ve been wondering how to make prints, but I don’t have a scanner and my works are too big! Thank you so much! I can’t wait to try it!
Glad you found it helpful Andrea!
Is there a specific MP in the camera you would use? Like 12-15MP?
I’d recommend using the highest setting your camera allows. Most modern cameras have plenty of MP so you don’t really need to worry about it.
Hey I was wondering if you can scan canvases that have sealant on it, or if you have to scan it beforehand…
Good question! I think it would depend on how shiny the sealant is. If it is likely to create a reflection (remember that a scanner shines a bright light onto whatever you are scanning) then best to scan before sealing. If it’s matte/satin sealant then I think you could easily scan it afterwards. If something has already been sealed with a glossy finish it would be best to take a high quality photo (using natural indirect lighting, no flash) to avoid glare. Hope that helps Shirley!
Hi Iris – do you have an affordable scanner recommendation by any chance? Would love to get one for home as I dive into selling my prints and making products. Any help would be appreciated!